Since I mostly focus on aquaculture for commonly kept aquarium species, let’s focus on the Tridacna Clam. One note though, in general, based on my research I found that most species of clams can be easily farmed using these techniques if they have similar reproductive methods as the Tridacna Clam.
When setting up any aquaculture tank for your broodstock – or breeding pairs – you need to first understand what their requirements are in order to thrive in captivity. The basic water parameters for this species are:
- Temperature: 72 F – 78 F degrees
- dKH: 8 – 12
- pH: 8.1 – 8.4
- Salalinty: 1.023 – 1.025
- Lighting: LED Coral Lighting or Metal Halide
In an aquarium they do best in reef aquarium set ups. The reason is that they are both filter feeders as well as photosynthesizers. Reef aquariums have the proper lighting required for this species as well as grazers and zooplankton that will keep the algae that they produce through the photosynthesis process in check. Reef aquariums also require trace element dosing – which this species also requires. More specifically calcium, strontium and iodine.
So in an aquaculture tank, the ideal set up is a shallow tank with a sandy substrate or bare bottom as long as the tank is not concrete or any other surface where the calm could easily attach itself to. You will also need optimal lighting, a dosing system and a source of live phytoplankton in order to feed the baby clams. More on this in a little bit. For now, let’s take a look at a proper Tridacna Clam aquaculture tank set up.
Tank Set Up
You can choose between a large fish safe shallow bin or a shallow aquarium. Keep in mind that this species can get 12 inches in diameter. So make sure that you can properly house that size of a calm in whichever tank you go with – since eventually it will reach that size.
The tridacna Clam attaches itself to a solid surface within a day of being introduced into an aquarium. Removing them from a hard surface is both difficult and potentially harmful to the clam. To remove a clam from a hard surface, gently cut each byssal thread with a razor blade as close to the attachment point of the rock or solid surface. Make sure not to slice or damage any tissue. To avoid this completely, use a sandy bottom in your culture tank.
So we have a sandy bottom or bare bottom, shallow tank equipped with reef tank lighting and a dosing system. So far, not too difficult, right?
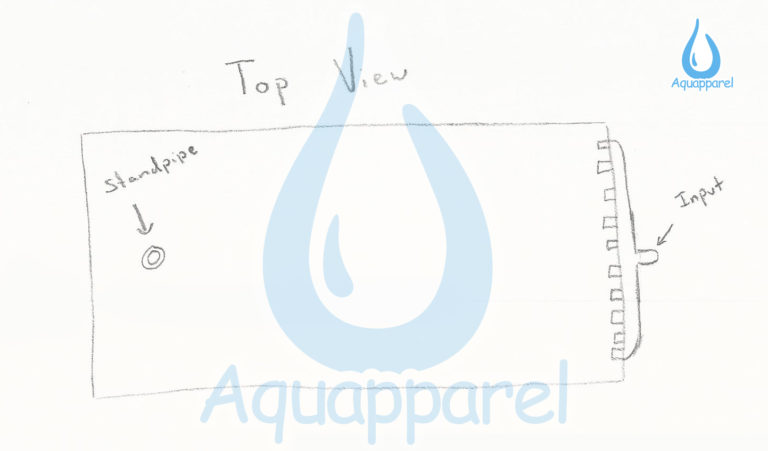
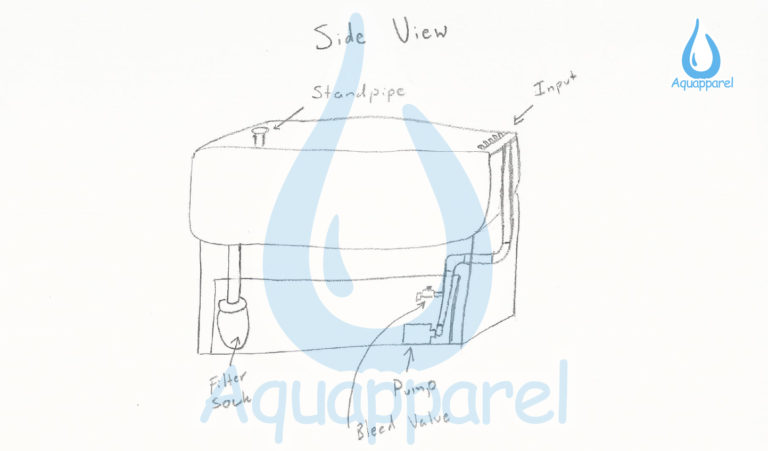
Next is the plumbing and water flow. This species does not like high flow areas. The do however, require good water quality which can sometimes be difficult to achieve with low flow systems. So here is what I recommend:
Have your input drilled into one side of the tank and your return/standpipe on the opposite side. When you plumb your pump – which will depend on the tank’s water volume capacity – be sure to plumb in a bleed value. This will help you to be able to adjust the water flow in the tank easily.
Ideally use a sump and have the tank cycled properly before you add in your broodstock clams.
Clam Placement
Place the clams with several inches in between one another and ensure that if this will be the clam’s main tank that they all have enough room to grow to full capacity which can be 12 inches in diameter.
Lighting
You can choose between a LED lighting solution or a metal halide solution. This is up to your preference and also should be considered from a cost and efficiency standpoint.
Feeding
Tridacna clams photosynthesize utilizing the light source. However, they can also filter feed on live phytoplankton. If you would like to learn how to culture your own, check my online course here: Live Food Course
Reproduction/How to Breed Tridacna Clams in an Aquaculture Setting
Here are the steps:
- Place the clam into a bin on it’s own
- Inject the calm with serotonin
- The clam will then expel sperm into the water column
- The sperm should then be removed and placed into the spawning tank
- Once the clam is finished expelling it’s sperm, it will back wash it’s gills and then release the eggs. These species cannot fertilize themselves, so they rely on the waves of the ocean to first move their sperm away from where they are positioned on a rock or in the sand and then they will release the eggs. This is why breeders will create a small artificial wave or similar movement in the water in the clam’s container that will let them know that it is now time to release the eggs. Since it is being done in a controlled, captive environment. So when the sperm is expelled the water has little to no movement or small artificial waves and then the eggs are expelled once the simulation is executed.
- Next the clam will expel eggs into the water column
- Once the eggs are collected, the eggs and sperm are placed into the same container where they will then become fertilized
- The fertilized eggs are then inoculated with fresh zooxanthellae so that they can eventually photosynthesize – which won’t occur until they reach 2” in diameter. In the meantime, the Tridacna larvae will feed on Phytoplankton. This grow out process can take anywhere from 18 to 24 months.
And there you have it! While this is very high level, I created this blog post in order to provide an overview of how this works. For further reading here is a very detailed resource that I found that includes all kinds of information and data: https://marine-aquaculture.extension.org/wp-content/uploads/2019/05/Nursery-and-Grow-out-Techniques-for-Giant-Clams.pdf
Watch Tridacna Clam breeding at the National Aquaculture Center: